
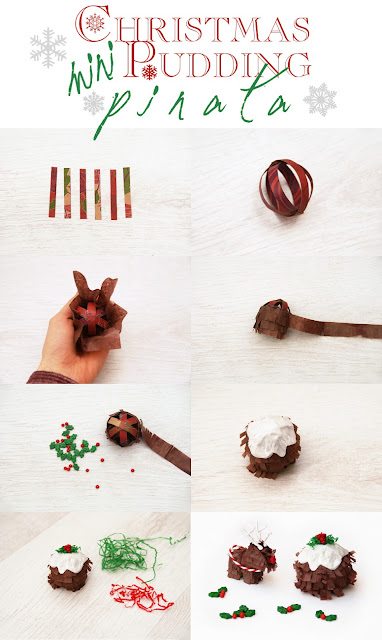
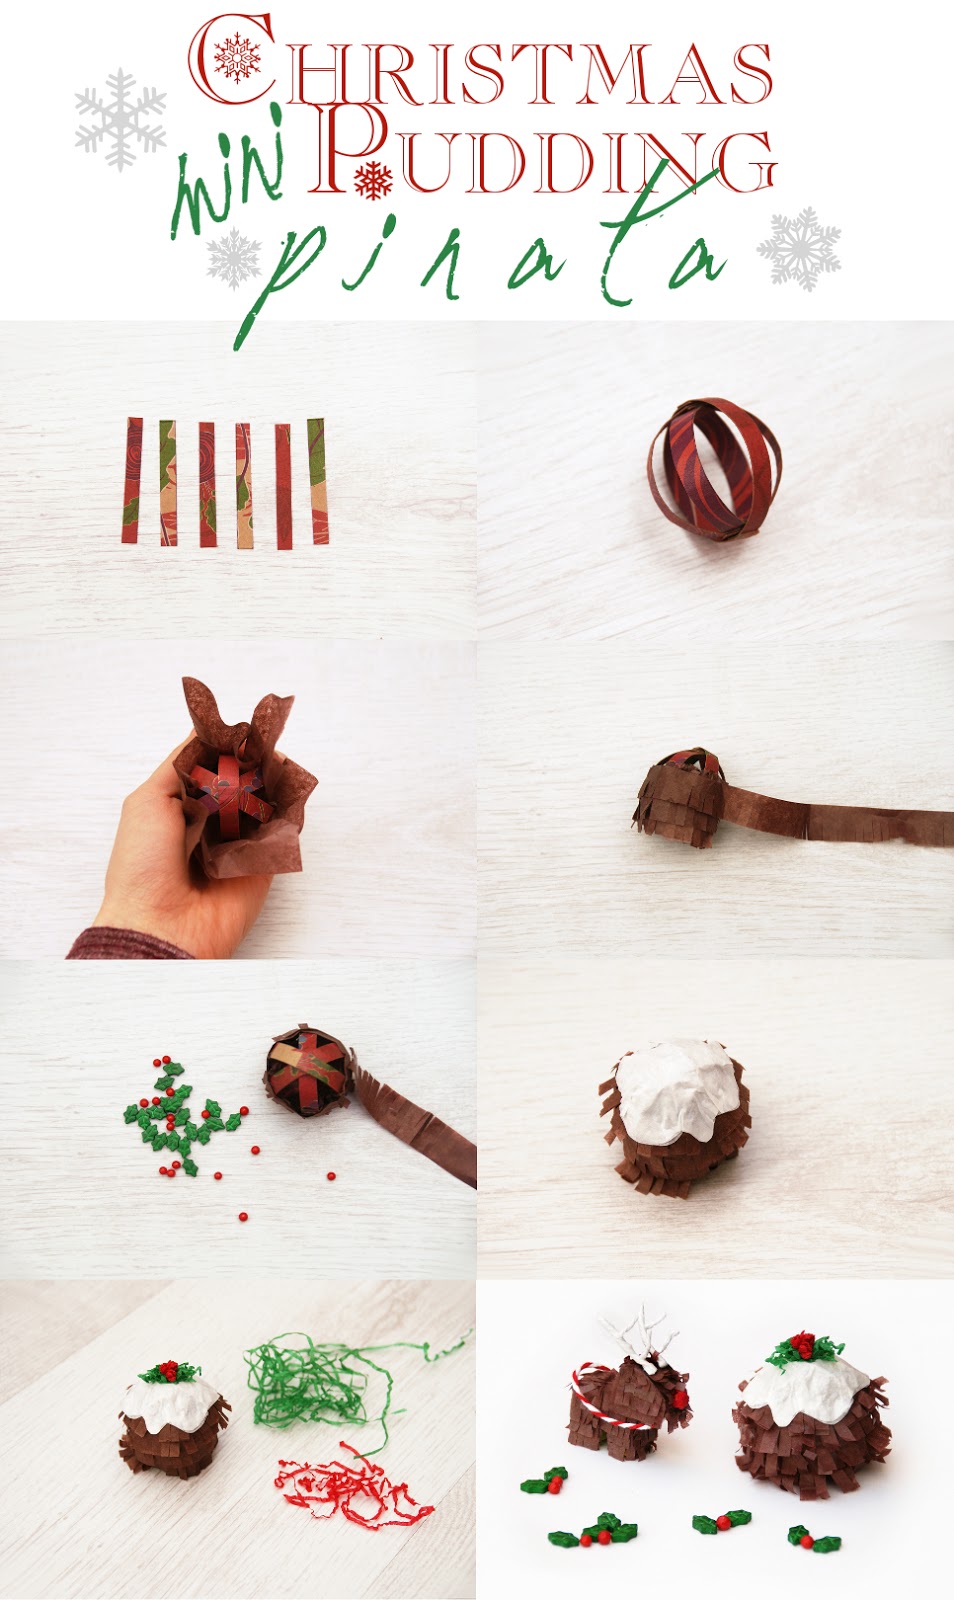
Hey guys! I've made a lovely little Christmassy craft for you all today: festive versions of my ridiculously popular miniature pinatas! I only planned on making one, but once I'd finished the Christmas pudding pinata, realised I'd missed the obvious: a reindeer. So I sat down as the idea struck - 10pm on the dot - and spent only 45 minutes putting it together. It was so easy! I admit that the colours aren't as fun, but you can always spice it up with some glitter. Christmas is glittery, after all!
They make a great alternative to Christmas crackers, which are often disappointing (unless you make your own), and look lovely on dinner plates for your Christmas dinner party. It's also a safer alternative to Christmas crackers for children if you're worried about it, or to spare poor pets the noise of the snap.
The size you make them is entirely up to you - mine are 5cm - but of course their size limits what you can put in them. I like to use cake sprinkles because they're so bright, cheap and plentiful, but chocolate buttons or chocolate chips or drops work just as well.
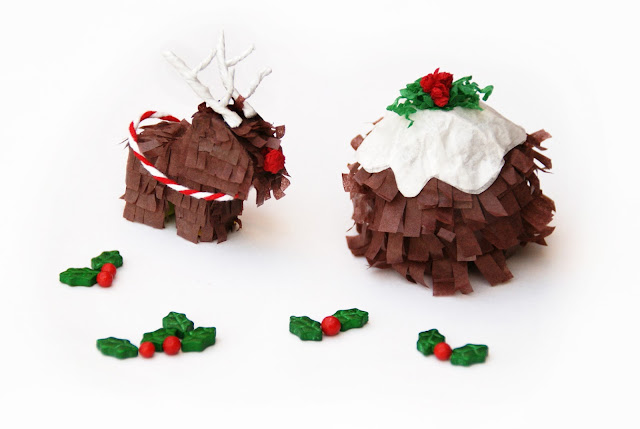 The reindeer pinata was an after-thought and is really just a variation of my original miniature pinatas, with the addition of antlers which are just tightly twisted lengths of white tissue paper, and a red nose which is balled up shredded red tissue, as that's all I had on hand. I gave him reins made of baker's twine, but I really wanted to give him a harness. The problem with that was that it made getting inside a little more difficult, so I just made do with this. Not bad for a last-minute piece.
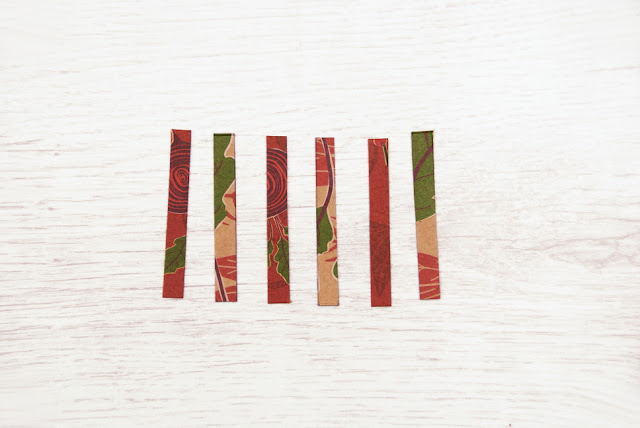
But what I really wanted to share was my Christmas pudding pinata! I made it with just 6 strips of cardboard (cereal boxes work perfectly) the same width and length, some standard glue and 4 different tissue papers. That is all. Oh, and the sprinkles to go inside, which I already had in the cupboard. It's a cheap but effective Christmas craft!
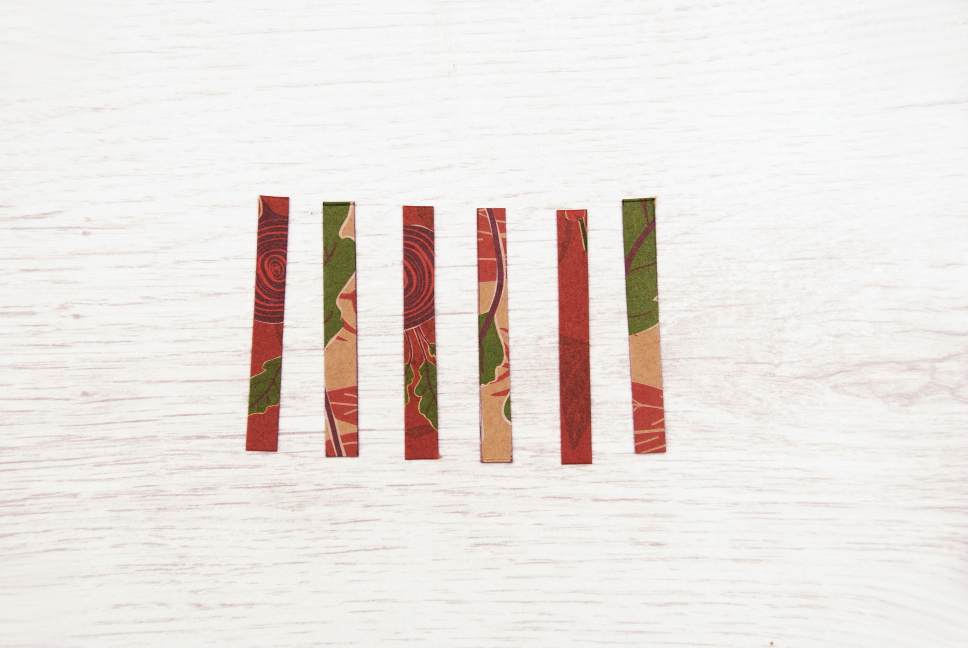
First, measure and cut your strips. Mine are 7cm in length and 7mm wide - the matching numbers are a coincidence.
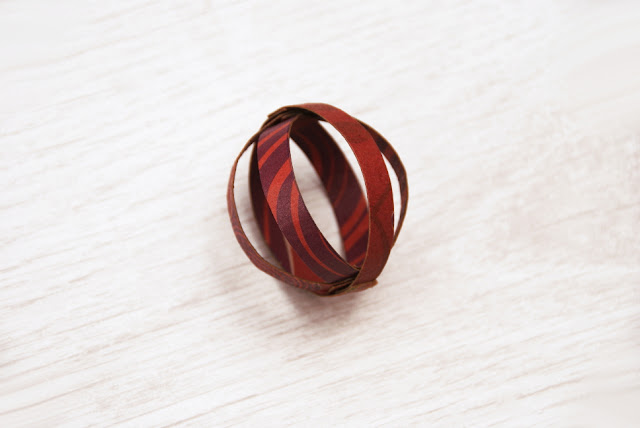
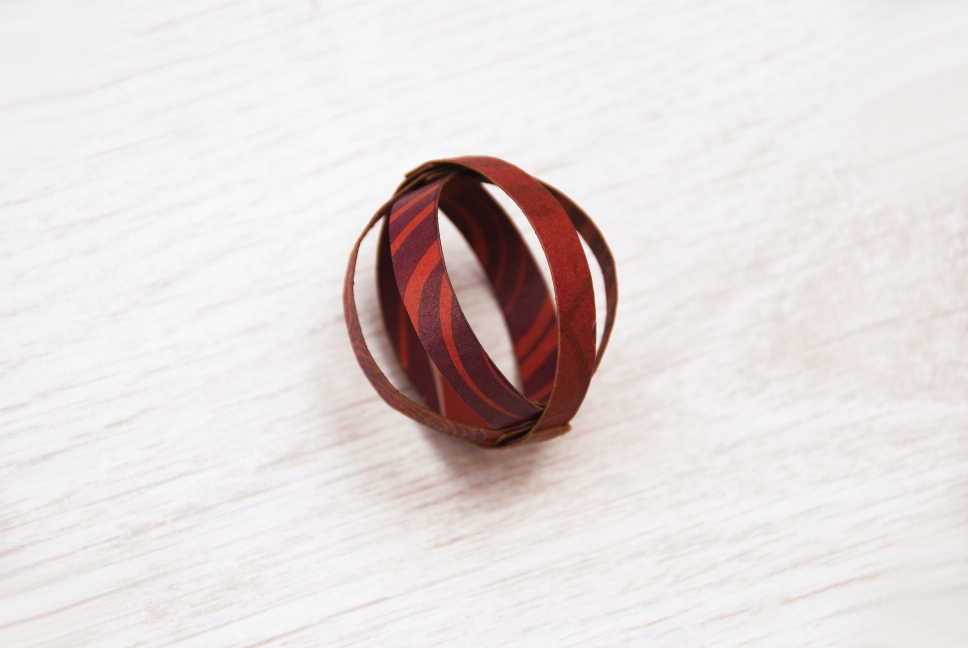
Next, pair them up and glue the ends together. I overlapped them by about 4mm. Once they've dried, put them together to make a ball. The easiest way to do this is to glue the other ends together to make three rings and then slip them over each other. It won't be perfect, but that won't matter. Set it aside to dry.
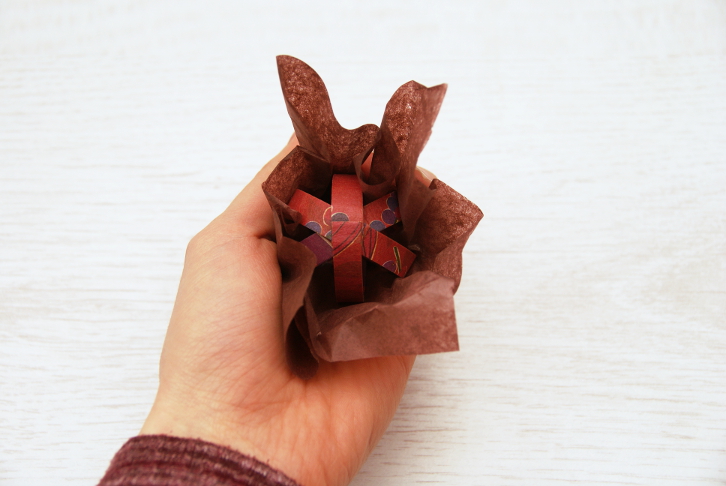
Once dry, paint some glue over the outside of each piece of cardboard, starting from the bottom of the ball and extending two thirds the way up. Take a piece of brown tissue paper and cup it in your hands, then put the ball inside and press the tissue against it. This gives the pinata more body so that you don't have to worry about the contents spilling out later. This won't be neat, but again, that doesn't matter.

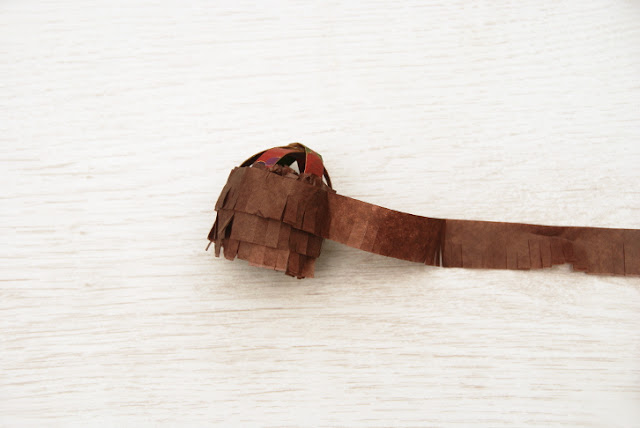
Next, take a long strip of brown tissue paper and fold it in half length ways, then fold it up into quarters or sixths and begin cutting slits along the open edge, not along the fold. I folded it to make a strip roughly 1cm wide, and the width will affect the length you'll need to cover it. Wider strips go around fewer times, whereas narrow strips probably look better but you'll need more, so you may well need to do this step twice.
Starting from the bottom, coil the tissue strip around and up the ball, adding splotches of glue over the ball as you go to fix it in place. Stop when you get to the top of the tissue base layer and add your filling.

Continue by adding glue then only to the cardboard.
The coiling won't be perfect at the bottom, and neither will it be at the top, but it's okay, and remember as you go that once you finish, you'll be ruffling the tissue by backwards stroking it and giving it a messy look, so don't worry about being precise with the spacing of each rotation.
Once finished, set it aside to dry.
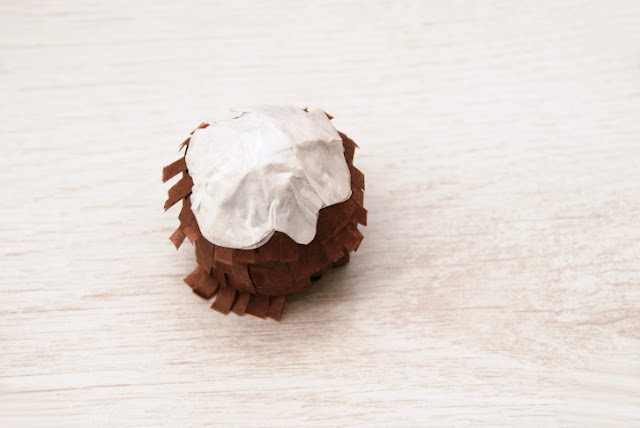
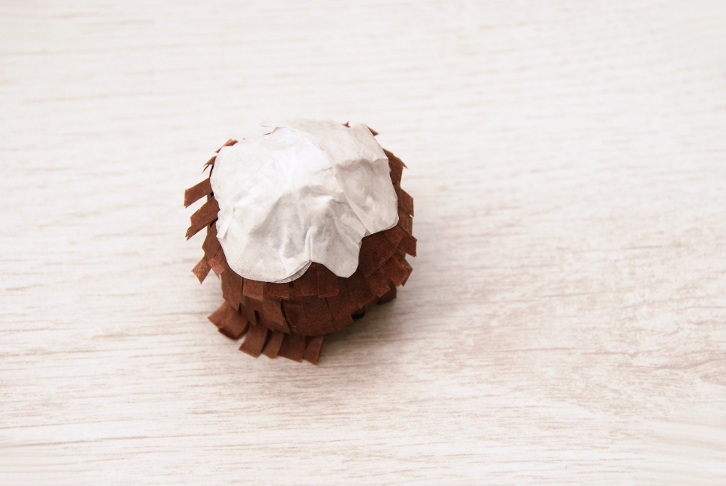
Take a piece of white tissue paper and fold it into quarters, then cut a splodge of icing out of it. I sized it with guess work and managed to get it right, but if you make it too big, you can easily trim it down. Once the pudding is dry, paint the underside of one of your four pieces of icing with glue and press it on top. It won't be perfect. It's a very imperfect craft!
Once that's in place, paint the top of it loosely with glue, don't absolutely smother it like you did the underside, then line up the next piece of icing and press it down more carefully, trying to keep the edges roughly even at least on one side. Add glue on top of that and add the next, and then do it again for the final piece.

For the holly, just roll some green shredded tissue between your hands, glue it on top by its centre, and then roll three bits of red shredded tissue into balls and glue them on top.
Once the whole thing is dry, gently backwards stroke the brown tissue to ruffle it up, and you're done!
They make a great alternative to Christmas crackers, which are often disappointing (unless you make your own), and look lovely on dinner plates for your Christmas dinner party. It's also a safer alternative to Christmas crackers for children if you're worried about it, or to spare poor pets the noise of the snap.
The size you make them is entirely up to you - mine are 5cm - but of course their size limits what you can put in them. I like to use cake sprinkles because they're so bright, cheap and plentiful, but chocolate buttons or chocolate chips or drops work just as well.

But what I really wanted to share was my Christmas pudding pinata! I made it with just 6 strips of cardboard (cereal boxes work perfectly) the same width and length, some standard glue and 4 different tissue papers. That is all. Oh, and the sprinkles to go inside, which I already had in the cupboard. It's a cheap but effective Christmas craft!
First, measure and cut your strips. Mine are 7cm in length and 7mm wide - the matching numbers are a coincidence.
Next, pair them up and glue the ends together. I overlapped them by about 4mm. Once they've dried, put them together to make a ball. The easiest way to do this is to glue the other ends together to make three rings and then slip them over each other. It won't be perfect, but that won't matter. Set it aside to dry.
Once dry, paint some glue over the outside of each piece of cardboard, starting from the bottom of the ball and extending two thirds the way up. Take a piece of brown tissue paper and cup it in your hands, then put the ball inside and press the tissue against it. This gives the pinata more body so that you don't have to worry about the contents spilling out later. This won't be neat, but again, that doesn't matter.
Next, take a long strip of brown tissue paper and fold it in half length ways, then fold it up into quarters or sixths and begin cutting slits along the open edge, not along the fold. I folded it to make a strip roughly 1cm wide, and the width will affect the length you'll need to cover it. Wider strips go around fewer times, whereas narrow strips probably look better but you'll need more, so you may well need to do this step twice.
Starting from the bottom, coil the tissue strip around and up the ball, adding splotches of glue over the ball as you go to fix it in place. Stop when you get to the top of the tissue base layer and add your filling.

Continue by adding glue then only to the cardboard.
The coiling won't be perfect at the bottom, and neither will it be at the top, but it's okay, and remember as you go that once you finish, you'll be ruffling the tissue by backwards stroking it and giving it a messy look, so don't worry about being precise with the spacing of each rotation.
Once finished, set it aside to dry.
Take a piece of white tissue paper and fold it into quarters, then cut a splodge of icing out of it. I sized it with guess work and managed to get it right, but if you make it too big, you can easily trim it down. Once the pudding is dry, paint the underside of one of your four pieces of icing with glue and press it on top. It won't be perfect. It's a very imperfect craft!
Once that's in place, paint the top of it loosely with glue, don't absolutely smother it like you did the underside, then line up the next piece of icing and press it down more carefully, trying to keep the edges roughly even at least on one side. Add glue on top of that and add the next, and then do it again for the final piece.
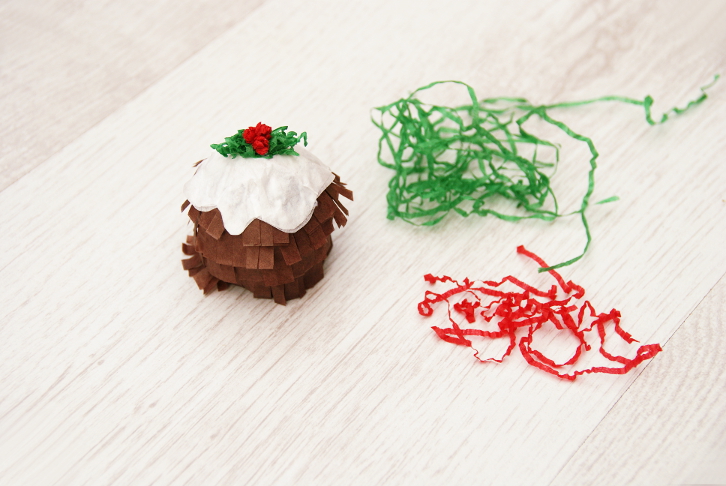
For the holly, just roll some green shredded tissue between your hands, glue it on top by its centre, and then roll three bits of red shredded tissue into balls and glue them on top.
Once the whole thing is dry, gently backwards stroke the brown tissue to ruffle it up, and you're done!

0 comments:
Post a Comment
I do read every single comment, and I will try to respond where I can. If you have an important question about my blog or my shop, however, then you might be better off contacting me directly by email. Thanks so much for reading my blog!