
Well, I finally did it. It took me
a whole week and then another week just to post it, but I finished it ^^ The
post is also a little late, but we won't worry about that :P At least I got it
up.
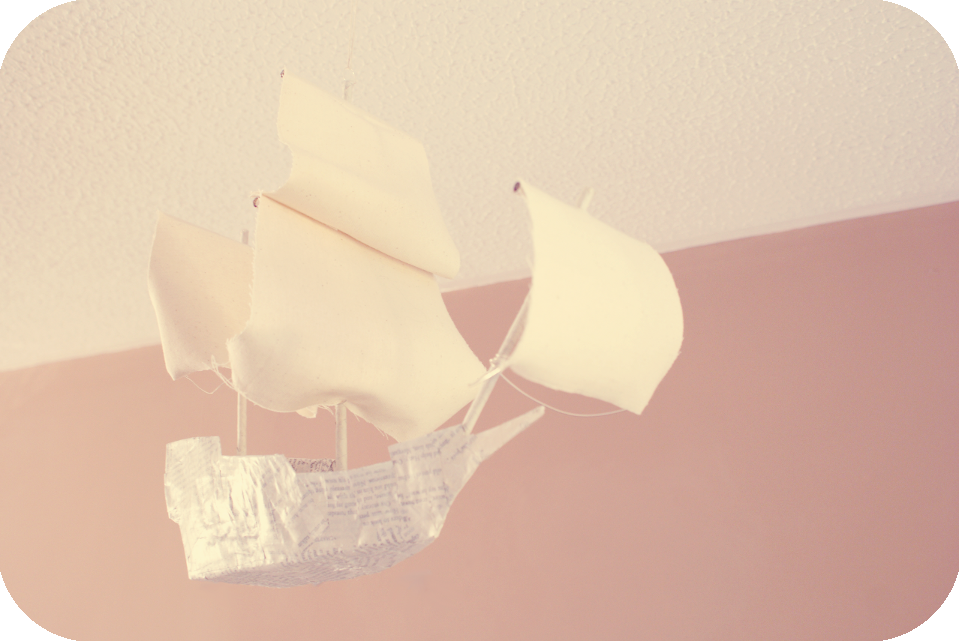
I love sailing ships, I do. I
don't know why. They're charming and exciting, but I will admit to not being
too keen to ever really get on one. I get seasick. But the sight of one from
solid, dry land is quite spectacular. Perhaps it's because I come from Bristol,
who knows?
Anyway, this week's Project 52 is
the frequently-mentioned "ship project". I haven't used paper mache
for years, not since primary school, and to be honest I'm sure I was doing it
wrong. But I went ahead with it anyway. I'm a huge procrastinator - as some of
you may well know by now - and I'll look for any excuse to put things off -
especially if they're important or exciting. There's a project regarding maps
that I've wanted to do for some time, but I haven't because I'm not confident
enough to try it (though it's only really painting). I know that I'm being
silly about it, and I will definitely do it some time soon, just likely not
yet.
This, however, I did do ^^ And
I'll talk you all through the steps should anyone feel compelled tojoin me in
my shipiness. I have plans for another old fashioned vehicle favourite of mine
which I actually will get on with quite soon. But for now, we'll just
focus on this ^^
And it's a long one.
You will need:
About 3 sheets of A4 (standard) card
PVA glue
A bowl
Paper strips (I cut up book pages to give it that something extra)
Sticks
Fabric
Thread
Wire
Tape
Hot glue gun
Method:
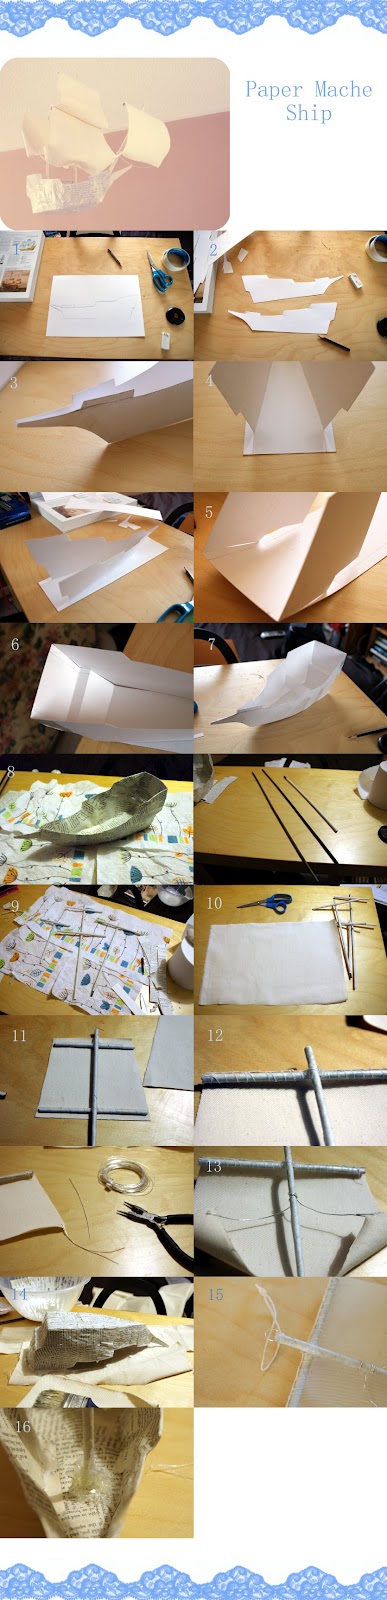
1. First of all, choose a ship body. I used the Half Moon, a Dutch ship
used by the East India Company, but the masts don't match. I chose it for its
shape. Draw the side of the ship on one sheet of card. You don't need detail,
just the outline will do. Mine stretched the length of the card but it wasn't
very high. In fact it looked a bit too low, so I drew it out again and it ended
up looking exactly the same, so I went ahead with it anyway. I figured
I'd rather it looked right and be low than look wrong and be higher. It turned
out perfectly in the end anyway. Also, my ship was flat-bottomed which meant I
was able to use the bottom of the cardboard as the bottom of the ship. If you
go with a typically rounded hull, then you'll want to draw it in the middle.
2. Once you've got your outline, cut it out. Lay it on top of the second
piece of card (unless you used up less than half of the width (portrait ways)
in which case just flip the card over) and draw around it. Cut it out again.
Don't worry if you've drawn the two outlines facing the same way. I panicked
momentarily and realized that I could just flip the card over when I was done
and the problem would be solved. I am a little slow at times.
3. Tape the very front of the bow of the boat of each pieces together. The
tape does not have to be tidy - this entire thing will be covered in paper
mache in the end anyway.
4. Once you've done that, cut a strip of card. It should be the width that
you want the ship to be at the widest point, so take your ship as it is at the
moment and bend the sides slightly to how you want it to be when finished. Grab
a pencil and (try to) mark parallel lines for that. The middle of the ship in
my case is wider than the bottom of the stern, so I made a second set of
markings for the width of the stern. Cut the card along the widest lines. The
image below shows mine once cut with the stern placed at its markings.
5. Now comes a tricky bit. The stern of my boat is a bit strange. In most
cases the stern would probably be quite smooth and curved, but the Half Moon
has two flat, straight surfaces, and one slanted. This caused me a problem. I
taped the top surface to the end of the strip of card (at the widest cut
because the top of my stern is wider than the bottom), and then I had to
fold/score the card to the side of the ship's specifications. I managed it, but
it wasn't easy, especially since the tape didn't want to take to the card I was
using, but I had to struggle with it. Do what you need to do.
6. I had to cut diagonally (thank you Harry Potter) through the strip of
paper from the widest markings to the narrower, but when I had done that I
taped the edges down. That still left me with excess bits of card around the
hull, but we haven't gotten that far yet. Focus on the stern first.
7. Now we've gotten that far. Spread the hull of the ship to the curved
shape you want and (again, try to) mark on the bottom card the rough shape you
want, then cut those lines and tape it to the body of the ship. It doesn't
matter if it doesn't quite line up because you cut too much off, the paper
mache will hide and strengthen these parts anyway. (the picture at this step
shows a strange strip of card inside the ship - this was there because the tape
wouldn't hold properly and I wanted to make sure the shape stayed when I
started mache-ing.
8. Now comes the long, fun and messy part. The paper mache. Mix up your
glue in the bowl. one part water and two parts glue. You don't need too much -
if you make too little you can always make more, and, for me at least, it was
still usable the next day, so it doesn't have to be done in one sitting, and,
in fact, shouldn't. On the third day I did need to add a little more water to
it, though.
Grab your strips of paper and run
them through the mixture. Remember that the wetter the paper, the longer it
will take to dry, and the more you risk a wrinkle in the finished piece. I have
a few, unfortunately, but I'll get over it.
Give it one full layer, inside and
out, then when that's dry, do it again. Give it as many layers as is necessary.
This is the longest part of the project, but the easiest. If any paper strips
end up folding over the cardboard in a way that there is excess on the edges,
they can be trimmed off later. Let the paper dry before adding another layer.
Or, alternatively, wait until it's almost dry like I did, and, again, risk
wrinkles.
9. Put the boat to one side. You could get on with this part while the boat
is drying, which I did not think of. Take your sticks and cut them to the
desired height. It's a good idea to stand them in the boat to get an idea of
the height you'll want, though I guess I should have said that earlier, before
your boat was soaking wet and stood upside down on the edge of your table. My
bad!
Take the sticks, and wrap paper
around them, or paint them, or leave them as they are, it's your call. I stole
these sticks from some orchids that don't seem to want to grow. These sticks
will make the masts. The longest of mine is about 40cm, I think. Cut the length
of the masts, decorate them as you wish, then cut shorter pieces for the
horizontal/diagonal beams which the sails are mounted on. Position them on the masts
to get a better idea of their length if you need to. Decorate these in the same
way, then take your hot glue gun and fix them to the vertical masts. I ended up
removing mine several times because they just weren't straigh enough. They
looked it from the back, but not from the front.
10. Take the fabric you've chosen for your sails. This fabric is really
what makes the boats unique. I used plain canvas that I've bought for the
previously mentioned map project, and I know that I'll have a lot spare
so it was fine for me to cut in, but using vintage fabrics from Etsy or your
local craft shop could make it look just gorgeous. I love ships too much to do
that, but I may make another in the future and do this with it.
Lay the fabric out flat and place
the masts on it. Mark the edges of the beam that the sail will be mounted on,
then mark another two corners further down at a wider width - I think the shape
is a trapezium? I was never good at maths. Or English, it seems, because
instead of "good" I wrote "goot". Make sure that the sails
are longer than your sail will be when it's fixed into place, then cut it out.
11. If you're worried about the fabric fraying you can seal the edges. I
think it can be done with a match or something but I know nothing about this,
and I would never recommend it unless you know what you're doing. I used a thin
layer of Mod Podge on the back and it seems to do the job, especially since
this isn't a toy, it's an ornament.
12. Fix your sail to the mast. I just loop stitched my way, since I cannot
sew to save my life. Once that was done I used more Mod Podge to fix the thread
to the beam (wrote bean) and keep it from sliding around.
13. Now you have several options. You could take some thread and stich it
to the bottom corners, then link it to the mast behind it, halfway between the
bottom of the sail and the top, or you could fix some wire to the back of the
sail along all three edges, bending the two sides to the same circular degree
and using the bottom wire to basically keep it on one side of the mast, or you
could do what I did which was probably the most complicated. It depends on the
thickness of your fabric really.
I cut some wire about the length
of the two sides, cut a small hole in the bottom corners and looped the end of
the wire through. I then took the other end of the wire and tightly wrapped it
around the mast at the same point I would have if it had been the threaded
method mentioned above. The two corners should be pulled back, this way. I then
bent the wire until I was happy with the way the front looked. I'm not that
happy with the sales, I realise now the mistake I made: they should have been
even longer. The curve of the sale to imitate wind isn't enough, as far as I
look at it. I did remove one sail because it wasn't wide enough, so they can be
cut off at the stitching if you want to make yours look better or correct any
similar mistake, even if you have Podge'd it.
14. Now I assume that your ship is dry. I'm writing this tutorial based on
the crooked way I like to do things. Like how I let my ship dry and did nothing
but watch Skyrim, rather than work on the masts, then finally worked on my
masts and did nothing with my perfectly dry ship, I now decided that, with my
masts ready to be fixed to the inside of the boat, now was the perfect time to
give it a thin layer of paint and make things ungluable for a further day! Yay!
I mixed up a bit of white acrylic
paint with lots of water and gave the boat three coats (drying between each, of
course) of paint. This reduced the harshness of the print of the pages, and
gave it a slightly shabby look, which I was fond of.
15. Fortunately, while this was drying, I was smart enough to think
of something else that needed doing (it had to happen eventually). I needed to
fix some way of hanging it up to the masts. I decided on the masts before, but
you could put it anywhere if you wanted - two at the bow and two at the stern,
I suppose? Either way, I grabbed some wire and made a nice big loop, then
generously hotglued it to the top of the two highest masts. Now, you could just
use the highest, middle mast, but you'll have to position everything just
right. It's not easy. It's the hardest part, actually.
16. Do this hardest part. Position the masts and hot glue them down. Be
generous with the glue on the mast that it will be hung by. If you're hanging
it by the hull then it won't matter, but don't be too stingey or they'll fall
down in the end.
17. Thread some string through the loop and hang it up. You're done. I want
to get some nice (fake) flowers to go in it and hang over the side. It'll be
hard to find the right ones and find how to manipulate them enough to get them
how I want them to look but it would look gorgeous when finished. If you're
willing to do the work on the hull and the masts, you could fix it so that it
could take real plants - even be a hanging planter! That would be awesome!
You could always add extra details
to the ship. Give it thicker paint and paint it to look like a real ship, maybe
even add much more paper mache and give it some more shape - a bust at the
front, even!
I want to get some appropriate
thin roping to add some ropework to the sides of the boat, but it'll have to
wait until I find some idea of what keywords to use to search with.
"String" and "mini rope" won't quite cut it.
You could hang things from it,
little clouds or something and make it look really dreamy, maybe even wrap some
small LED lights around the masts and edge of the boat. There's plenty you
could do.
And plenty of ships, from galleons
and frigates to small sailing boats and even little fishing boats with no sails
at all. I might give that a go and hang it from the hull.
Hopefully next week I'll have a
similar project on an old land-based vehicle, but I don't know if it will be
done in time. We'll have to see.

Thank you for posting these instructions! I will give it a try. I love your ship.
ReplyDelete